Nuxt.jsでFirebase REST APIを使ったサインアップ・ログイン機能の作り方
Nuxt.jsでFirebase REST APIを使ったサインアップ・ログイン機能の作り方を紹介します。
Nuxt.jsでFirebase REST APIを使ったサインアップ機能の作り方
Firebase Authenticationを使用
まだサービスを使ったことがない人が、メールアドレスとパスワードで新規登録してサインアップできる機能を作ります。
Firebaseのプロジェクトを作成したら、Authenticationの「始める」をクリックします。
そして、サインアップの方法を選択します。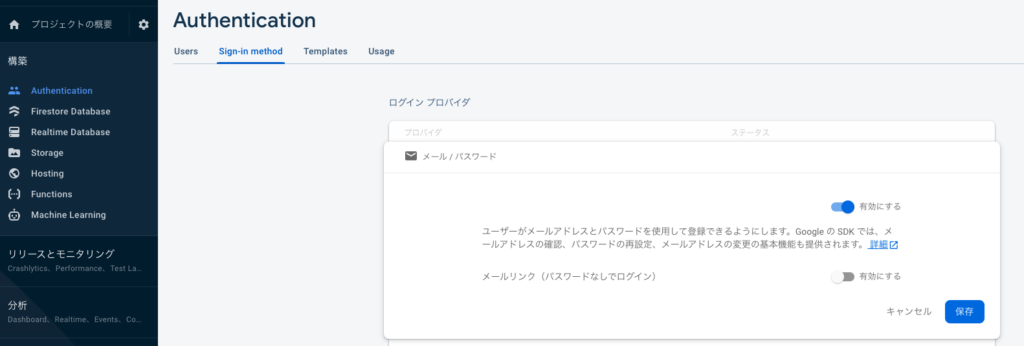
メールとパスワードであれば、上のように有効にして保存します。
Firebase認証REST APIのページでエンドポイントURLを取得
Firebase認証REST APIのページを訪れます。
そして、エンドポイントがリクエストを送る先なので、メール・パスワードでサインアップという項目を探して、そのエンドポイントに記載されているURLをコピーします。https://identitytoolkit.googleapis.com/v1/accounts:signUp?key=[API_KEY]
FirebaseのAPI_KEYを取得
この[API_KEY]の部分は、Firebaseで入手する必要があるので、プロジェクトの概要、アプリの追加でwebを選択してapikeyを取得します。
Firebaseの詳しい使い方に関しては、Nuxt.jsでfirebaseを使う方法を参考にしてみてください。
pages/auth/index.vueを作成
<template>
  <div class="admin-auth-page">
    <div class="auth-container">
      <form @submit.prevent="onSubmit">
        <AppInput type="email">Eメール</AppInput>
        <AppInput type="password">パスワード</AppInput>
        <AppButton type="submit">{{ isLogin ? 'ログイン' : 'サインアップ' }}</AppButton>
        <AppButton
          type="button"
          btn-style="inverted"
          style="margin-left: 10px"
          @click="isLogin = !isLogin">{{ isLogin ? 'サインアップ' : 'ログイン' }}へ切り替える</AppButton>
      </form>
    </div>
  </div>
</template>
formタグでは、@submitで即座にページ更新されると困るのでpreventをつけます。
axiosをグローバルに設定していないのなら、上のようにインポートします。

リクエストボディペイロードで、メールアドレス、パスワード、returnSecureTokenを設定する必要があると記載があるので、そのオブジェクトを用意します。
そのために、まずは、templateで、emailとpasswordにv-modelを追加します。
<AppInput type="email" v-model="email">Eメール</AppInput>
<AppInput type="password" v-model="password">パスワード</AppInput>
そしてdataに初期値を設定します。
  data() {
    return {
      ...
      email: '',
      password: ''
    }
  },
そして、オブジェクトを作成します。
 {
        email: this.email,
        password: this.password,
        returnSecureToken: true,
      }
Nuxt.jsでFirebase REST APIを使ったサインイン・ログイン機能の作り方
すでに登録している人が、ログインできるようにする機能を作ります。
サインアップのときとほとんど同じですが、リクエストを送る先が変わります。
メール・パスワードでサインインという項目を探して、そのエンドポイントに記載されているURLをコピーします。
>>>サインイン(ログイン)の場合の公式サイトhttps://identitytoolkit.googleapis.com/v1/accounts:signInWithPassword?key=[API_KEY]
[API_KEY]の部分は、Firebaseで入手したものを使います。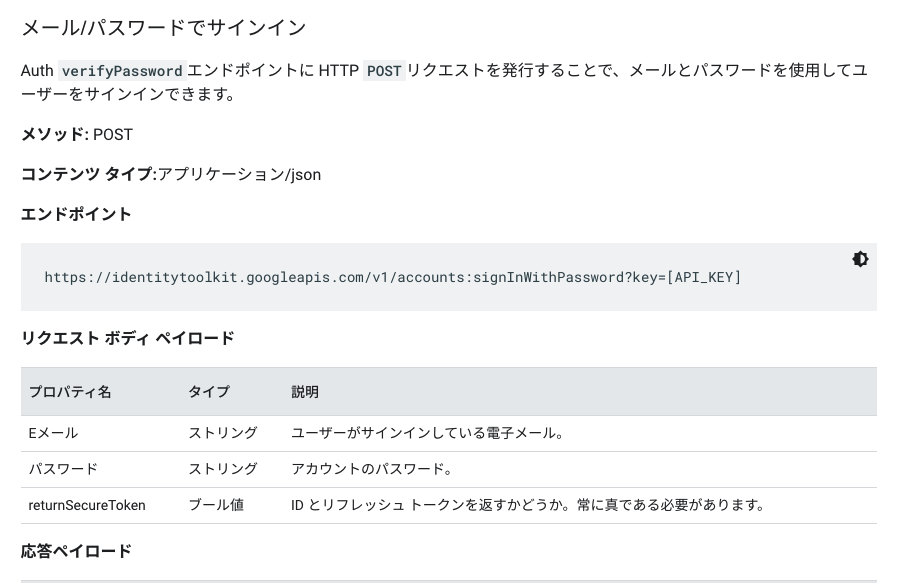
リクエストボディペイロードの内容もログインとサインアップは同じです。
ログインとサインアップの処理をまとめる
ログインとサインアップの処理は同じで、URLのみが異なるので、次のようにscriptを書き換えます。
<script>
import axios from 'axios'

export default {
  data() {
    return {
      isLogin: true,
      email: '',
      password: ''
    }
  },
  methods: {
    onSubmit() {
      // デフォルトのURL(ログインとする)を設定
      let authUrl = `https://identitytoolkit.googleapis.com/v1/accounts:signInWithPassword?key=${process.env.firebaseAPIkey}`

      // ログインモードでない場合、サインアップのURLをセット
      if(!this.isLogin) {
          authUrl = `https://identitytoolkit.googleapis.com/v1/accounts:signUp?key=${process.env.firebaseAPIkey}`
      }
      // ログイン/サインアップの処理
      axios.post(authUrl, {
          email: this.email,
          password: this.password,
          returnSecureToken: true,
        })
        .then(result => {
          console.log(result)
        })
        .catch(e => console.log(e))
      }
  }
}</script>
リクエストを送る先であるエンドポイントのURLを変数authUrlに格納して、isLoginで切り替えます。
その後、ログイン・サインアップの処理を記述します。
vuexでTokenを保持する
pages/auth/index.vue
処理内容はsctionsに移動するので、pages/auth/index.vueは、dispatchします。
  methods: {
    // ユーザー認証
    onSubmit() {
      this.$store.dispatch('authUser', {
        isLogin: this.isLogin,
        email: this.email,
        password: this.password
      })
      // actionsでaxiosをreturnしているのでthen()が使える
      .then(() => {
        this.$router.push('/admin')
      })
    }
  }
Firebaseのtokenを格納するためのstate、
それを保持できるようにするためのmutation、
authUserというactionをstore/index.jsに記述します。
store/index.js
state
    state: {
      token: null, //ユーザー認証
    },
tokenを格納したいのでまずはstateに変数を用意します。
mutations
    mutations: {
      // ユーザー認証のmutation、tokenをセット
      setToken(state, token) {
        state.token = token
      },
    },
tokenをstateにセットするためにmutationを作成します。
actions
    actions: {
      // ユーザー認証のaction
      authUser(vuexContext, authData) {
        // デフォルトのURL(ログインとする)を設定
        let authUrl = `https://identitytoolkit.googleapis.com/v1/accounts:signInWithPassword?key=${process.env.firebaseAPIkey}`

        // ログインモードでない場合、サインアップのURLをセット
        if(!authData.isLogin) {
            authUrl = `https://identitytoolkit.googleapis.com/v1/accounts:signUp?key=${process.env.firebaseAPIkey}`
        }
        // ログイン/サインアップの処理
        return axios.post(authUrl, {
            email: authData.email,
            password: authData.password,
            returnSecureToken: true,
        })
        .then(result => {
          vuexContext.commit('setToken', result.data.idToken)
        })
        .catch(e => console.log(e))
      },
    },
そして、actionを設定します。
axiosのモジュールを使っている場合は、then()ブロックはresultやresponseではなく、dataにダイレクトにアクセスできるので、result.data.idTokenではなく、data.idTokenとすることでアクセスできます。
IDトークンによる認証
Realtime Databaseのルールを次のようにauthされている状態でないとwriteできないとします。
{
  "rules": {
    ".read": "true",
    ".write": "auth != null",
  }
}
その場合、ログインしているユーザーしたwriteできなくなります。
そして、上のようにIDを保持しただけでは、データを送信してもエラーが返されてしまいます。
認証されたリクエストをRealtime Database REST APIに送信するには、vuexのstateのtokenに保持したIDトークンをauth=というクエリ文字列パラメータとして渡す必要があります。
Firebase公式サイト:IDトークンによる認証によると、"https://.firebaseio.com/users/ada/name.json?auth="
というURLのため、?auth=というパラメーターとIDトークンを記述すればいいことがわかります。
よって、actionsで、
editPost(vuexContext, post) {
return axios.put(`${process.env.baseUrl}/posts/${post.id}.json`, オブジェクト)
...
}
という部分を下のように変更します。
editPost(vuexContext, post) {
return axios.put(`${process.env.baseUrl}/posts/${post.id}.json?auth=${vuexContext.state.token}`, オブジェクト)
...
}
stateには、vuexContextからアクセスできます。
これでIDトークンによって認証されている状態となります。
middlewareを使ってログインしていないユーザーをリダイレクトするには、middlewareを使ってログインしていないユーザーをリダイレクトする方法を参考にしてみてください。